
My mom used to tell me stories about how obsessive her mother was about spring cleaning. The oven would be pulled away from the wall so my mom could get back there to clean. All the furniture was moved out of room after room so my mom could clean thoroughly. Every piece of china and cutlery was removed from the kitchen so it could all be re-washed and dusted. By my mom. At the time it just seemed like my mom was endlessly cleaning while my grandmother did what? Delegated? But now I realize the impact those stories had on me: an almost religious need to clean in spring. If I don’t, unseen, horrible filth will grow and accumulate in the dark recesses of my home until it eventually swallows up me and my family.
That said, I don’t do an old-school Portuguese cleaning of my house every spring. Mostly. However, I do apply that obsessive attention to my wardrobe, especially at this time of year, with a seasonal flip. And while I know it’s good for my clothes, it also keeps my obsessive cleaning demons at bay.

The seasonal wardrobe flip is also one reason I don’t get tired of dressing well: twice a year I pack up all my clothes and get a whole new batch. I’m not throwing away the old and buying new – as many people do today – but storing one set of clothes while unpacking another. This is an old idea and one most often practised by women, but as more and more men return to dressing well, with that comes a potentially larger and more diverse wardrobe in need of special care. Combine that with limited closet space and the need arises to store away the clothes you don’t need for long periods of time.
I’ll warn you straight away that this involves a fair amount of work. There’s cleaning, sorting, repairing, trips to and from the dry cleaner, packing and unpacking. But the advantages far outweigh the work: your clothes will last longer if properly taken care of, you get to re-discover some of your favourite items, the switch from winter to summer (or summer to winter) becomes even more marked and special and you get a new wardrobe without spending any money.
I recently swapped my winter wardrobe for my summer one and documented the process, should you care to give it a try. There are three main steps to a seasonal flip: sorting, cleaning, and packing. One reason to do these carefully and meticulously, as many have learned only too late, is to avoid the dreaded clothes moth. Any tiny specks of food, dirt or even sweat left on your clothes are breeding grounds for the moth eggs which, when they hatch, release hungry, hungry larvae who will eat up your precious suits and sweaters. So do everything you can to get your clothes as clean as possible, then make sure you store them properly.
Purge and Repair

A great advantage to doing a seasonal swap is that you get the chance to have a good look at your wardrobe. This is often the time when I realize there’s an item I haven’t warn all season and it’s time to give it away. Also, this is when I finally get around the fixing that loose button, darning that sock or any other small repair I may not have noticed during the season.
Dry Cleaning

Despite having a dry cleaner I trust, I don’t dry clean that often. It can get expensive, and if the suit isn’t worn much or doesn’t have a smell or stain or mark I can remove myself, I don’t dry clean. So when it comes to the seasonal swap, I assess all my suits for cleanliness. This keeps the dry cleaning down to perhaps once or twice a year for most of my suits. That said, dry cleaning is the best way to rid your suit of moth eggs, although moths will still happily lay new eggs once your suit is in storage.
Steaming
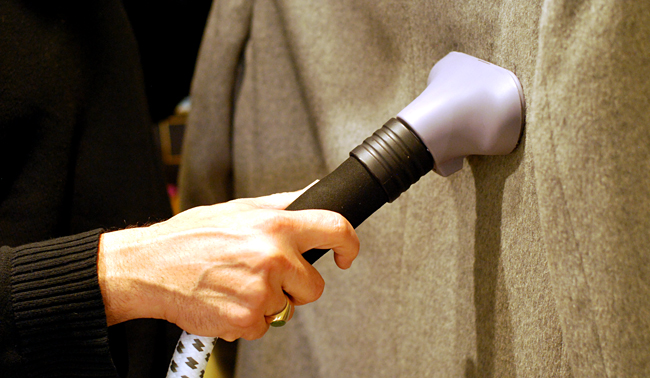
Suits that aren’t dry cleaned obviously cannot be machine or hand washed. Instead, I do a combination of brushing and steaming. The heat of the steamer will of course remove creases and wrinkles and I like to think kill any moth eggs I happen to catch. So I give my pants and vests a good steaming. With suit jackets, I only steam the arms and back because the steam will reshape or even damage the structure in the front, lapels and collar.
Brushing
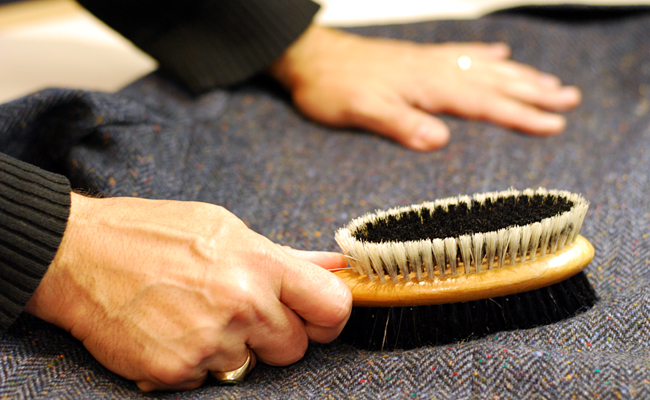
Something I do on a regular basis, but is especially important in a seasonal swap, is brush my clothes. Not only will this hopefully dislodge any moth eggs in the fabric, it will also remove speaks of dust and dirt. Friction caused by moving in your clothes can break down the fibres if little bits of dust and dirt are present. Start by brushing, with long strokes, from the bottom up, then from the top down. I prefer a Kent clothing brush.
Hand washing sweaters

Many quality sweaters need and should be dry cleaned, but many more do well with a hand wash. This is a simple process: add hand washing soap to a basin, then very cold water, then soak the sweater for a few minutes. Squeeze the water through the sweater a few times, then empty the basin and refill with cold water, squeezing the sweater until no more bubbles appear in the water. This may take 3 or 4 sink-fulls of fresh water. Never wring or twist the sweater. Once all the soap is gone, squeeze out as much water as you can then roll the wet sweater up in a dry, clean towel and press down hard. Lay the sweater out on a new towel until dry. This is by far the most time consuming part of the seasonal swap from winter to summer as each sweater can take a day or more to dry and depending on how many towels and open spaces you have, it may take a week. But rest assured, next fall they will emerge from storage clean and happy and ready to wear.
Storage

In an ideal world, I would have a huge, cedar closet in my basement for all my seasonal clothes storage needs. Right next to that, would be my walk-in humidor along with full wine cellar. Until that day comes, I have to settle for plastic. For my sweaters, casual pants, socks and other small items, I use large Rubbermaid containers. Make sure they are stored off the floor on a shelf, so bugs can’t crawl in. And to make sure your clothes don’t get moldy, drill holes in the top of the container. I know these look like perfect little doorways for bugs, but since my clothes is packed as clean as possible, I’m more concerned with letting humidity escape, as the plastic is not at all breathable.
Packing clothes in tissue paper

Inside that large plastic container, all my clothes are packed carefully with tissue paper. This insures the clothes (especially shirts and pants) do not develop deep creases in them. It is a great pleasure, as I have just experienced, to open the container after 6 months to find that my linen summer shirts are ready to wear, without a pressing.
Suit bags

The clear choice for packing suits are suit bags, which keep them dust-free and form at least some barrier against moths. I never use full plastic bags as they do not breath and any moisture that might be left in your suit will cause mold or a nasty smell.
If you flip your own wardrobe, please comment below with any of your tips or techniques. After all, we obsessives have to stick together.


Leave a comment